Showing posts with label DIY. Show all posts

Thursday, December 15, 2011

Work in progress and a thank you for you.........

Busy busy busy..........handmade labels, the printer's been working full time today! This year, I decided to customize the labels for my thank you gifts. They're not very holiday-themed as there are a ton of printables out there, and I wanted the labels to really stand out. I used regular card stock to print these labels on; the original prints were made using the wooden blocks and scanned to create digital facsimiles. I think they came out rather well don't you?


I plan on using these tags on little brown paper packages (tied up with string, of course) that will carry my top secret (LOL! )spice blends for marinades. Accompanying them will be the recipe cards you see above. For the vegetarians, there will be parcels of home made cookies (with accompanying recipe cards).

And while I'm making goodies for friends I can see and touch, I can't very well forget you can I, dear reader? I thought you might like to use some pretty labels too. Actually, since they're not very holiday theme-y, you can use them for other occasions as well. So here you go, my sweets---make sure you download the original file for the full resolution images. (It's a pdf file, 168 kb in size, so it won't take up much space.)


OPaPLabels


PS: This is my first time sharing a document on blogger, if there are any hiccups, please do let me know, I'll try my best to resolve any issues. There is a watermark in the document, to prevent it from being appropriated, but it falls in the area you would discard when you cut out your labels. I'm really excited to be able to share this with you, do let me know if you liked the labels and whether you think you'll be using them. Here's the link to the file in case the embedded document takes forever to open, though, at 168 kb, why would it take so much time to open is a mystery to me.

Thursday, May 5, 2011

Baagh Singh: Chief Tabby-in-Residence.

So here he is folks, as promised. Meet Baaghwinder Singh (you can also call him Baagh** Singh  if you feel the name in its full glory is a mouthful) and yes, he currently occupies the exalted position of chief tabby-in-residence. He likes to go romping in the jungle, peeping through leaves while he stealthily stalks his prey and POUNCES!!


 (**Baagh, for those of you not familiar with the word, is the hindi and punjabi term for "Tiger")


 Sneaky Cat!


 Frolicking in the sunlight...

His favorite spot at home is either on my table where he runs amok, messing up all the papers (yes, he's the one that made the current mess on my table. Cats I tell you!) and of course he just loves the sunny ledge on my windowsill...he can sit there for hours (and days! LOL!)

I'm taking a couple of days off blogging, there are several tasks that need to be tackled and I have only one business day left to accomplish it all in (Oh, the pressure!), I may pop in over the weekend just to say hello..... Till then, be good, (miss me?) and have a great weekend!

PS: What do you think of my copycat styling? (pun totally unintended). Catch the original here. ;)

Thursday, April 21, 2011

Where do you stash it all away?

Hello hello! First up, an update: Weight off my mind (finished all the forms, waiting for one last letter to arrive, and hopefully it'll catch the post tomorrow). Whew. Thank you for all your sweet comments--you make my day, you know!  So I'm back and chipper, and I thought I'd catch up with y'all! There's this post I've been meaning to write for donkey's ages and it involves a load of BLING! (coz' a girl can't ever have enough, right?) So where do you hang it all up? I find that if I leave it in drawers or boxes, it gets into a whole tangled mess that I can't be bothered to deal with. Out of sight, out of mind.  I was scouting around the web and I found some lovely ideas out there....

Fill an emptied out Yankee candle jar with eye candy? Yes! Read the complete how-to here.


An old picture frame, some plywood, and burlap, a ton of creativity and voila: Functional art! For more pictures and the complete how-to, skip on over to the Songbird blog.

Or perhaps you remember Justina's method? Cushion for earrings, rolled up 'zine for bangles, pretty teacup for rings.....I love it all!
Credit: Compai. For the home tour, click here.

While I'm on the topic, I thought I'd share how I do it as well! I'd bought these two mug racks (less than two bucks, y'all!) on one of my many thrifting expeditions last year. Since they were disparate colors and the wood wasn't really in such great shape, I had spray painted them black and then used a bit of sandpaper to add a little distressing to the edges. It's really not visible in these pictures, but a bit of the wood tone shows through and (I think!) it looks very pretty.


The nicest part is that I have access to my jewelry--I love bangles! and they add a huge splash of color against the black furniture (don't ask! My home office table was black to begin with and all add-ons over the years just seemed to be black! ) It's (still!) very much a work in progress and hopefully over the years it will evolve into it's own element....This room is pretty much my sanctuary. (Disclaimer: it's not always in the best shape, as it can get very messy with piles of paper (and loads of unfolded laundry, LOL!) )


At the moment the accessories add all the color..... (see these posts on where I blog from: 1, 2 and 3. )

 An eyeload of my bling!!


Where do you stash it all away? --I'd love to know!


Thursday, April 14, 2011

Reader love!

So I got a lovely e-mail from one of my readers, Sarmistha, a couple of days back. She wrote:
"I follow your blog with great interest .Tin cans are in abundance in my house. I often paint them in bright colors and store anything from spoons to eye and lip color pencils. The list is endless. yesterday I was so inspired by your paper clay project  that I rushed to the nearest Michaels to grab a packet  and get started. I have attached a couple of pictures. They are not nearly as good as yours , But I felt an urge to share them with you."
Sarmistha, that was the sweetest thing to do! I'm flattered, and so touched that you would actually take out the time to do this. You've given me yet another reason to keep blogging! Thank you SO much for sharing your take on the paper-clay can!

 How cute is that peacock? Love his designer tail!

She even took it one step further and made it three dimensional! (I'm so doing that the next time around!) Is that adorable or what?


Oh and I have to add, my pencil holder does make me happy, every day! Are you inspired by Sarmistha's work? Thank you so much for sharing Sarmistha! You made my day.

Wednesday, April 6, 2011

Paper boats and clay tigers.....

Sometimes I wonder if I ever really grew up. In a world of mature grownups who want to collect the latest in crystal, I long for the simple joys of my childhood. Woh kagaz ki kashti, mitti ka khilona* (paper boats and toys of clay.). So the latest object to catch my fancy is this fleeting glimpse of a toy tiger, crafted by hand, probably from clay or paper-mâché.


Originally from. First spotted here.

Needless to say I was obsessed, I had to have it. Now the India trip's already done and I probably won't be able to get my hands on it anytime soon, so what recourse did I really have? The only option was to try to recreate it. It helps again that this is a prime example of folk art and perfection isn't of import. So here it is folks, my work in progress, as it dries on a shelf. (LOL, it looks more like an inquisitive kitty-cat at this stage, doesn't it?) I'm going to let it dry thoroughly, smooth over the cracks, add some more dimension to the face (his ears and nose need some reconstructive surgery, LOL!)  and paint it a bright orange. And stripes. :D 

I promise I'll share the finished tigger tiger with you once he's done. I can't wait to play with him decorate with him.


*Poetic license!

PS: If those words brought it all rushing back, here's a passable version of the song. (I'd like to add here, that tho' I do love to reminisce, I also love to look toward the future. So do indulge in nostalgia, for it's important to be connected with your roots, but don't let it drag you down into a big mopey mess. Because you won't be doing justice to life by living in the past.) {Gyan over}


PPS: If, upon reading this you think I have all the time in the world, you couldn't be farther from the truth. This is me indulging in pure escapism. Hi, I'm Gagan and I'm a life-long procrastinator.


Saturday, January 15, 2011

Can* I do it?--a DIY story.

Of all things that touch our lives, it's funny what the heart remembers and wants to hold on to. When I was in college, I had a lovely Madhubani paper-mâché pencil holder---it was bright and vibrant and it made me very happy. My dorm room had a nice heavy desk with drawers and I had covered the working surface with heavy blue paper (yes, I really loved the color back then!). Anyhoo, sometime last month, I started obsessing  over my pencil holder--if I could just have it, my table would be perfect (do I have deeper issues here--we'll leave those for the analyst! :D). But it's near impossible (okay, prohibitively expensive!) to find a replica of my beloved  pencil holder out here in the boonies. So the only solution was to make one. You saw a sneak peek of the project here. Here's the end result:


Okay, that's not too Madhubani-y, but I just love the colors!! It has all my favorite motifs--Paisleys, peacocks, flowers, totas (Indian parrots).........It's colorful and it makes me happy. So here's the deets on how I did it--materials/supplies and tips. I can't do a tutorial, because my hands were involved in crafting and I couldn't hold the camera and do that at the same time. Maybe it's time to get a mini tripod+update my photography skills. A lot to do, so little time.......... :)

Okay. Materials/supplies....
1. Empty soup can. (I used Campbells chunky. LOL!!!)
2. One pack creative paperclay. From Michaels. I didn't use all for this project....in fact I may have used only about a quarter for this project(where did the rest go?--I'll share that in a bit!). I liked many things about this medium--it was very malleable, which is a big plus! it wasn't overly messy--I've done paper-mâché from scratch (newspaper soaked in a bucket--loads of work!) and this was easy to work with. It also airdries, so that was good. Only thing was that once it dries, it tends to crack along fault lines/areas where you overlap two strips. I repaired the cracks with a thinned out slurry that I applied and later smoothed out with water.


The how-tos of it all:
1. Take a lump of clay. Roll it out to quarter inch thickness--try to get it as oblong as possible, since it needs to cover the tin. Drape the flattened roti (for want of a better word, LOL!) over the tin. It's surprisingly pliable! roll out another oblong and drape it over areas that were left bare in the first attempt. Press it over the tin lightly--it should stick! now trim off the extra bits--make sure you fold some over the open edge. Roll the tin over a smooth surface (like you would a rolling pin) to smooth out the surface. Set to dry.
2. Fill in any cracks that may have appeared.
3. Sketch the design with a pencil.
4. Paint!
5. I totally cheated on the black lines---by the time I was done painting, I didn't have the patience to fill in the outlines with a zero number brush. So I grabbed a sharpie and defined all outlines with it. Who will know? (Just me and the entire interwebs, LOL!).

Some more thoughts: once dry, it's just like paper (handmade paper) and I found that I could use a regular eraser to correct any mistakes---though I tend to press my pencil in quite hard, and I did leave an impression behind....it lends to the handmade charm IMO! Once I used the sharpie, I had a D-OH moment. I could just as easily have filled in the colors with my kid's markers (but I like the effect of brushstrokes, so I'm happy with how it turned out). I think that this project would be an easy one to try at home with paper strips, soaked in a 1:1 mix of water and glue.

If you want to try it, go for it!!! Ain't rocket science!

Now lets all admire my handiwork.......

 Said impression. Tota= <3 <3


 A proud peacock, basic flowers. Not aiming for perfection..........


Imperfections are there, but not really visible + I don't care......

If you want to buy the real thing, The Color Caravan carries these beauties.......

...........plus loads of other little goodies!


* Let me bring to your notice yet another attempt at a feeble pun. I crack myself up!! LOL!!!! Yes I can DIY (DIM??)

Disclaimer (don't you just love them!?!): Not an advertisement for any product. No paybacks-- cash , kind or unmentionable were involved. I run a clean kitchen. I doubt if Michaels or the paper clay company even know I exist. And I couldn't care less!!!! :D

Wednesday, December 8, 2010

DIY: home-made potpourri

Lovely readers, how are you? I realize it's been a while since I shared a good ol' DIY with you. This request (among others) was put in by my friend Divya of SHP. She wanted to know how I make my own potpourri...here's one way of making it. Next time when you get flowers home, don't discard them once they start to droop..... clip flowers close to the base (calyx) (if the petals fall off, collect them too). If you live in colder climes, spread the flowers out in a single layer near the heating vents (I just dump mine into a colander and prop it near a secluded heating vent). Another good area is the boiler room (make sure the petals are contained, and you're not about to spark off a fire!). Any dry, warm spot with circulating air should work just fine. Avoid exposing them to sunlight though, as they may lose color. Give them anywhere between a couple of days to a week. If you pile the flowers up, they'll get moldy, so make sure that they have enough air circulating around them.  Seasoned gardeners have designated areas where they dry flowers on the stem. For amateurs like me, this low tech option works just fine.....


Remember these tulips?--The petals dried beautifully!--since they were thick, they took almost a week to dry out (but at that point of time, we hadn't turned on the heating, which could, potentially, have hastened the process). Other flowers that I have worked with which dry into gorgeous potpourri-- my red salvia, roses, cacti flowers, pinks. Only flowers I've had trouble with were chrysanthemums, possibly because I tried drying the whole head of flowers. Oh well.

Pool together flowers of similar hues for a gorgeous, natural potpourri!! If you want, you can add a few drops  of essential oil; I like mine unscented and use them to provide a splash of color.....

 
Further reading:
Design*Sponge carried an article on making your own blends with herbs and spices.
This article explains the process for adding essential oils to the mix.
This excellent post covers the art of extending your cut flowers' life. 

Do you have any tips to share? (barring "buy a bag from your local {insert shop of choice here}" --My lazy way out!!)

:D


Monday, November 1, 2010

Over the weekend (or what I did while dinner simmered)....

The divine musical quintet, enjoying some glorious sunshine!


Hello y'all! howz the diwali decor progressing? Mine is coming along very (very!!) slowly. But I know we'll pull it off in time, we always do! :) I wanted to share a simple DIY with you. A couple of days back fellow-blogger Archana posted this fabulous idea where she used her kolam stencils to highlight some tealights. (You need to check out Rang Decor for more fab. ideas!) I loved it, but I was so bummed because I don't have all these gorgeous crafts at my disposal, sitting here, continents away. So yesterday, while dinner was simmering on the stove, I decided to take things into my own hands. It ain't rocket science after all!! (those who know me, know that this is the most used phrase in my vocabulary!). So I sketched out a lotus pattern (because that was the one that caught my eye and because of a certain blogger, I may have lotus patterns on my mind ;) ). So anyway, armed with a nail and hammer, I went at it....


(I had these paper plates left over from pizza takeout. I try to avoid using paper plates if I can....)


So it's not exactly perfect, but not bad for half an hour's distracted tapping, eh? I'm just trying it at the moment, not sure whether I will really get the time/be in the mood to make this on diwali....I'll need a darker background to really make it pop, and I'm not sure how I'll pull that off. I tried the kolam with rice powder at first, but I think it might have been too grainy to give the effect I was looking for. The outline did get traced out; however, it wasn't there yet. This is with all purpose flour---I used a sifter to dust the powder onto the plate/stencil and then lifted it off without disturbing the pattern below. Do you have the "real" stencils? What technique do you use to achieve an even pattern? (I realise that my hole-punches weren't evenly spaced and that is something I will work, should I decide to go with this for diwali!) 


Artsy setting! :) Please note my recycled diyas (from diwalis past....)

More pictures....because I couldn't stop at JUST one! (Bear with me---it's just the ham acting up!!!)


Come on, you know you want to see more!!
Okay. I'll stop already!  :) linking to the weekend roundup....


What are you up to?

Thursday, August 12, 2010

Dog days of summer!!

Now that school has started, my mind is set on auto-mode for fall. Yes, even as we reel under the current heat wave, I'm silently rooting for fall, which, to my mind is the most pleasant time of year in this hemisphere. However, as summer is not done yet, here are a few random summer-y pictures celebrating summer's last hurrah...........


My view from P&P central!! Herbal tea cup...with, (what else?) herbal tea!!


This large hand-painted and hand-glazed mug with the patina-ed lid was a thrift store find. It now cradles a solitary stem of pothos and sits next to the window to take in the afternoon sun in my home-office. The book is by Thrity Umrigar, my most recent author-crush. (Sadly, I couldn't get past the first page of this one (the weight of heaven). Some themes are too graphic for me since I became a mom....) I would highly recommend "the space between us", though...I love her fluid style of writing. I don't need to wrestle with sentences packed with ornate words...some times I'm just not in the mood to!!! Also, she doesn't subscribe to the "we all live cra99y lives and then we all die" book club. No stomach for doom and gloom books anymore!! Have you read her? What did you feel? write in, I'd love to hear more....


DIY coasters. My bit of indulgence in kitsch. (photoshop+modge-podge+discarded CDs).. :)

What did your summer entail? talk to me.....


Friday, July 23, 2010

Paisley Friday!

This week for paisley fridays, I'd like to share a little project that I worked on last weekend........I present to you my new paisley cushion. It is now happily perched on the couch in our living room.....


So the cushion itself was pretty inexpensive-- a set of two for $9.99 at world market (I used a coupon + some store credit for it as well--what can I say?- I'm cheap careful with my money)... and i absolutely loved the colors (it was just the pop of color my living room needed), the only thing bothering me?-it was kinda---flat! no zing, no pop, nothing much going for it apart from the zany print....so what's a girl to do?  I'm not a glitter/sequin person and this was already busy enough... so I decided to do some (very slapdash) embroidery to pick out the pattern a bit and make it look more spendy than it was.....here's the before...

 
(this is also the back of the pillow at the moment...not planning on any touch ups for the back)


and the after......(just showing a close-up of the work--really slapdash, but who cares...its not I like I have to be graded on it (anyone else out there remember SUPW classes.... :) remember, how we hated them?....well, sometimes a little extra knowledge does come in handy!!--tho' I'm sure sister Mary would cringe if I presented this in class!!  :) )


so anyway, now that I'm feeling very pleased with myself (doesn't take much does it?) and have shown off some really shoddy workmanship, I'm sure you'd like to see it in perspective (just a little peek, because one area still needs work...I promise I'll post pictures when I'm satisfied!)

My little pop of color in the living room...


(sorry for the cr#pp% picture)

So, what do you think? There's a lot of other rust/orange/yellow action going on elsewhere in the room, this corner needed something to tie it in... will post more pictures soon....


Happy friday and enjoy your weekend folks!!!....and remember to check back next week...we're flying to the orient to meet an artist and tour some homes........

Wednesday, July 7, 2010

What I've been up to today....

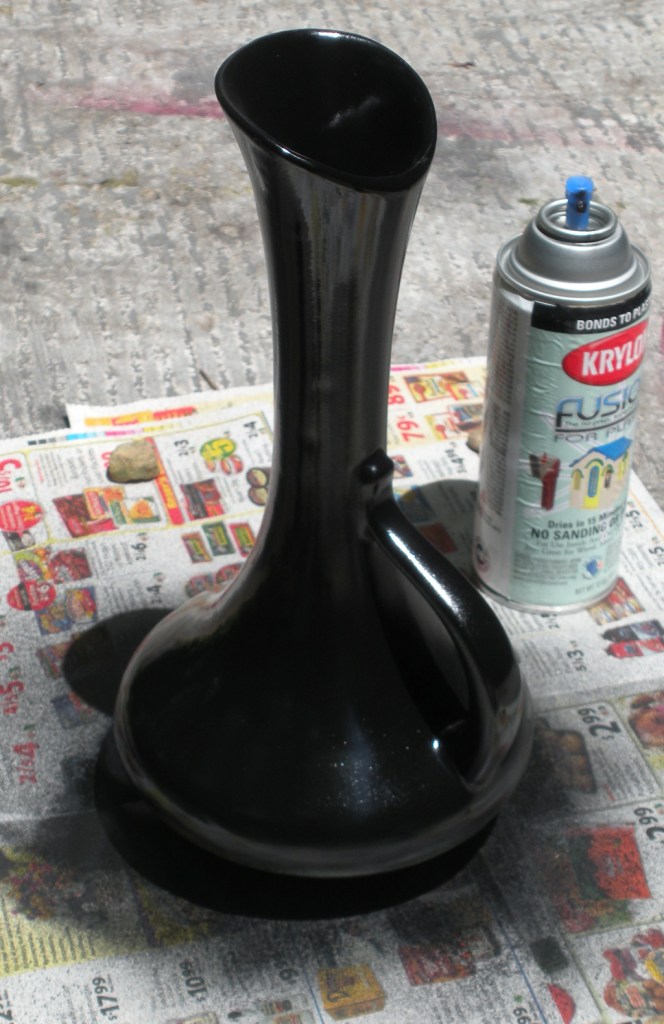
On one of my thrifting adventures, I had picked up this vase for $1.99. Not bad, eh? I absolutely love its graceful shape- reminds me of a surahi (a clay pitcher or pot with an elongated, graceful neck).


So. It came home with me. Only problem is I don't care much for its green color. So I'm thinking-- that's another DIY project. Let's see how that works out.....


Well, today I finally got off my posterior.... and decided to do something about in. A couple of coats of spray paint later....Tada!!


Can't wait for it to dry....

Friday, June 25, 2010

Here's to the power of doing.....

Industry: in·dus·try  \ˈin-(ˌ)dəs-trē\

n., pl., -tries.

1 : diligence in an employment or pursuit; especially : steady or habitual effort.
2 : systematic labor especially for some useful purpose or the creation of something of value............


What do you do when, after years of use (and some particularly sloppy eating), your dining chairs end up looking like this....
Please focus on that HUGE stain front and center!!!


Why, you roll up your sleeves and get to work...........

You grab one of these


And take it apart..............


Then you grab one of these.............

and some awesome-fabric-that-looks-like-leather....

(extreme close-up  ---my skills as a photographer are very limited people, so please trust me when I say this looks like a million $$$)

please check out this awesome fabric again...I held out for the longest time because I didn't have the right fabric to work with- I would have loved to go the floral/print/ikat/suzani/statement-y stuff route but hubs weighed in heavily on the matter (yup, there's two of us making the decisions and it had to satisfy both our tastes)......another thing that swayed me toward this fabric was that it is a classic and a neutral...which means I can switch up the decor in the dining room with table runners and the ilk--- enter gorgeous fabrics (i.e. my choice)+ if butterfingers drops stuff on it, (hopefully) it cleans right up. And it looks sooo good.


Aaaaand get to work! (no pictures of me working on it coz I had to keep the fabric stretched taut and didn't have any twiddly thumbs to spare!!)...In any case, I'm not much of a tutorial gal--you can find some excellent tutorials on re-covering chair seats here and here.

Voila! Finished product........

Okay all apologies for the poor photography- but it looks sooo professional -there are no wrinkles anywhere, and best part- no more ugly stains!!

Some tips-
1. Make sure to press down hard on the staple gun, otherwise the staples don't sit flat against the surface.
2. I didn't bother with removing the original fabric since there was no structural damage to the seat cushions.
3. Pick a heavy-weight fabric- it has to stand up to the wear and tear.

Two down, 4 more to go, but I'm getting there....I'm presently juggling several DIY projects that I hope to post up here as they're done.....its going to be another busy weekend for me.


Now I want need some suggestions from you- should I or shouldn't I use some scotch guard spray to ensure easy clean-ups? I haven't ever done so earlier (but you can see the result of that!!)- any advice will be appreciated!!


Next home
Related Posts Plugin for WordPress, Blogger...